Lens geometry
Hemispherical lenses
The lens geometry affects the way the hemisphere viewed by the camera is
reproduced as a circle on the hemispherical picture. The
horizon is a circle and the zenith is its centre. Within the circle, any pixel
has a relative radius corresponding to its distance to the centre divided by the
radius of the horizon circle. Between the zenith (zenith angle Θ = 0) and the
horizon (Θ = π/2 rad), the relative radius and the zenith angle are
related, but this relation is not exactly linear and depends on the type of lens
used to take the picture.
Wide-angle lenses
If the viewing angle of the lens is below 90° from the centre (Θmax
< π/2 rad), then the horizon is not visible. Depending on the focal distance
of the lens (and on the size of the sensor on digital cameras), only parts of the
circle representing the viewing angle may be visible, or the picture frame may even
be filled, with no visible circle. In the latter case, it is possible to use the
edges or the corners of the picture to set the viewing angle. Any point beyond the
chosen viewing angle or beyond the edge of the picture frame will obviously be
omitted from the analyses.
Settings
In Hemisfer, a polynom up to the 5th grade is used to calculate the zenith
angle Θ as a function of the relative radius R:
R = a1 Θ + a2 Θ2
+ a3 Θ3 + a4 Θ4
+ a5 Θ5
Note that this function has 2 fixed points (0,0) and (Θmax,1).
For this reason, the last parameter is always fixed by the previous ones.
The parameters of different lenses are stored in a file named LENSES.CSV. The
location of the LENSES.CSV file depends on the permissions that users have on the
installation folder of the software. In a standard installation, users do not have write
permisssions there and the LENSES.CSV file is thus put in the
AppData\Roaming\Hemisfer folder within the user folder. In this case, installing a
new version of Hemisfer will not affect the current LENSES.CSV file. However, if
the programme folder of Hemisfer is writeable (typically on an external drive for
a portable use) then the LENSES.CSV file will be located directly there. If this
LENSES.CSV file is not found or if the definition of the current lens is not found
in it, then Hemisfer will search it in the current working folder from which
photographs and parameter files are being loaded. It is also possible to load a specific
lenses file by clicking on the load lenses  button. To avoid discrepancies between different versions, however, it is recommended to
work with the lens file in its standard location.
Delta-T's HemiView LENSES.CSV files have
a similar structure and can thus also be read by Hemisfer. Beware of possible
format changes that may be introduced if you edit a LENSES.CSV file with a
spreadsheet software: in some cases, it may become unreadable for Hemisfer.
If the lens is in your lens file, then you can chose it from the pull-down
list. If not, then you can define a new lens by clicking on the new lens
 button. To delete a lens from the
list, click on the delete lens
  button. These changes are made permanent only after clicking on the
save lenses
  button.
Designing a new lens function
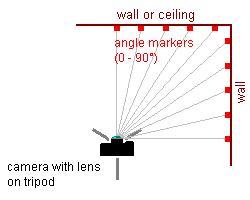
If you don't have parameters for you lens, then you have to measure them
yourself. Use a setting like this to take a picture of angle markers:

On the picture, measure the position
of the markers from the centre and express them as a fraction R of the picture
radius. Calculate then a polynomial regression of R against Θ, like in the
equation above. If necessary, refer to the documentation of your statistical
software to do this. It is barely ever necessary to use all 5 degrees of the
polynom. Decide according to the precision you wish.
 button. To avoid discrepancies between different versions, however, it is recommended to
work with the lens file in its standard location.
 button. To delete a lens from the
list, click on the delete lens
  button. These changes are made permanent only after clicking on the
save lenses
  button.