North direction
To set the slope on the picture, it is necessary to set
first the position of the north, which is counted in degrees, counter-clockwise
from the top. If the picture was taken with a self-leveling device having a compass,
then a marker should be visible indicating the magnetic north. After setting the
horizon, it is easy to set the magnetic north by clicking
on up and down arrows  till
the red dash
till
the red dash  comes on the
marker. If the zoom
comes on the
marker. If the zoom  is
used, then the window is automatically adapted during this setting. The declination
is then set as a positive angle if the magnetic pole is right of the geographic
pole, negative if it is left. (Left and right are here meant in reality or from the
border of the picture; from the centre of the picture it is the contrary because
the photograph is taken upwards.) The geographic north appears as a green dash
is
used, then the window is automatically adapted during this setting. The declination
is then set as a positive angle if the magnetic pole is right of the geographic
pole, negative if it is left. (Left and right are here meant in reality or from the
border of the picture; from the centre of the picture it is the contrary because
the photograph is taken upwards.) The geographic north appears as a green dash
 on the
display.
on the
display.
Declinations for any location and time can for example be found at
https://ngdc.noaa.gov/geomag/calculators/magcalc.shtml.
The north declination can be stored as a property of the
site but also as a picture parameter.
This is because the declination is not constant but varies with time. It may thus
be different on pictures from the same site taken at different moments. Further,
the declination as set in Hemisfer can be used to correct the
magnetic effect of the photography material itself (camera, lens, gimbals,
tripod).If a declination is defined in a parameter file,
then it will override the site declination. Choose to save or not the declination
along with the parameter file by checking or not the corresponding box on the
site tab within the options
dialogue.
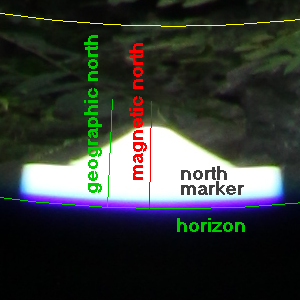
An example of a declination of +2°